Royal Front Hand Mehndi Design: The Ultimate Guide to Mastering Intricate Patterns
Mehndi has been an integral part of cultural celebrations for centuries, and among the many styles, the royal front hand mehndi design holds a special place. Known for its intricate patterns, elegant motifs, and regal aesthetics, this style is perfect for weddings, festivals, and grand occasions. Crafting such a design requires a blend of creativity, precision, and patience.
This comprehensive guide will walk you through the steps to create a stunning royal front hand mehndi design, from gathering tools to mastering intricate details.
I. Introduction
A. Brief Overview of Royal Front Hand Mehndi Design
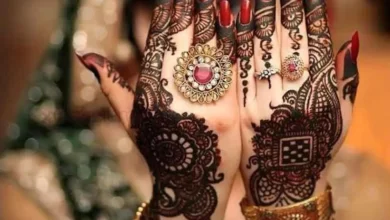
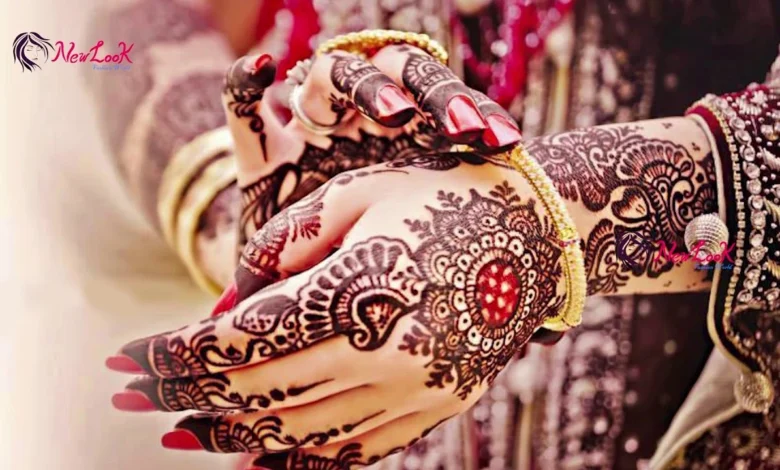
The royal front hand mehndi design is a sophisticated art form that combines geometric patterns, floral elements, and elaborate details. It is designed to cover the palm, fingers, and often extend to the wrist, creating a cohesive and grand aesthetic. These designs are inspired by royal traditions, showcasing opulence and artistry.
B. Importance of Mastering This Intricate Art Form
Mastering royal front hand mehndi designs not only elevates your artistic skills but also allows you to add a personal touch to celebrations. Whether you’re a professional artist or a hobbyist, learning this craft opens doors to creativity and cultural appreciation.
C. Purpose of This Guide
This guide aims to provide a step-by-step approach to creating a breathtaking royal front hand mehndi design, ensuring you have the skills and knowledge to execute flawless patterns.
II. Main Body
A. Step 1: Gather Necessary Materials and Tools
Before starting, ensure you have the right tools and materials:
- Mehndi Cones or Applicators: Opt for high-quality cones with smooth and consistent flow.
- Cleaning Supplies: Use mild soap or hand sanitizer to clean the skin.
- Moisturizer: Keeps the skin hydrated and enhances mehndi application.
B. Step 2: Prepare the Hand for Application
Preparing the skin is crucial for a neat and long-lasting design:
- Cleansing the Skin: Wash the hands thoroughly to remove dirt and oil.
- Moisturizing: Apply a light moisturizer to create a smooth base.
- Creating a Smooth Canvas: Ensure the skin is dry and free from residues before starting.
C. Step 3: Sketch the Basic Outline
Planning the design ensures symmetry and flow:
- Central Focal Point: Begin with a central motif like a mandala to anchor the design.
- Main Structural Elements: Outline major patterns, such as borders or vines.
- Symmetry Considerations: Use light guidelines to maintain balance across the hand.
D. Step 4: Create the Central Mandala Design
The mandala serves as the heart of the royal front hand mehndi design:
- Starting from the Center: Draw a small circle or floral pattern in the middle of the palm.
- Building Intricate Patterns: Add concentric layers of petals, loops, or dots to expand the mandala.
- Maintaining Balance and Proportion: Ensure all elements are evenly spaced.
E. Step 5: Develop Floral Elements
Floral motifs add elegance and grace:
- Adding Petals and Leaves: Surround the mandala with stylized petals and leaves.
- Incorporating Traditional Motifs: Use paisleys, lotuses, or roses for a regal touch.
- Blending with the Central Design: Seamlessly connect the floral elements to the mandala.
F. Step 6: Integrate Geometric Patterns
Geometric shapes bring structure and refinement:
- Incorporating Royal Elements: Add diamonds, squares, or lattice patterns for a regal effect.
- Creating Borders and Frames: Use straight lines or arches to frame the design.
- Balancing with Organic Shapes: Complement sharp angles with soft curves for visual harmony.
G. Step 7: Add Fine Details and Embellishments
Details elevate the design from simple to stunning:
- Dots and Dashes: Fill gaps with small dots, lines, or zigzags.
- Swirls and Curves: Add flowing patterns to connect larger elements.
- Negative Space Techniques: Use intentional gaps to highlight intricate sections.
H. Step 8: Extend the Design to Fingers and Wrist
A complete royal front hand mehndi design extends beyond the palm:
- Creating Cohesive Patterns: Ensure the finger designs match the palm’s theme.
- Adapting Designs for Smaller Areas: Use minimal yet intricate motifs for fingers.
- Ensuring Flow and Continuity: Connect wrist patterns with the palm for a unified look.
I. Step 9: Apply Finishing Touches
Perfecting the final design ensures a professional result:
- Filling in Gaps: Identify and fill any empty spaces.
- Refining Lines and Shapes: Clean up edges for a polished appearance.
- Final Symmetry Check: Review the entire design to ensure balance.
III. Conclusion
A. Recap of the Key Steps
Crafting a royal front hand mehndi design involves meticulous preparation, planning, and execution. From sketching the basic outline to adding intricate details, every step contributes to a stunning final result.
B. Importance of Practice and Patience
Mastery comes with consistent practice and attention to detail. The more you experiment, the better you’ll understand the nuances of mehndi art.
C. Encouragement to Experiment
While traditional patterns are beautiful, don’t hesitate to incorporate personal touches. Let your creativity shine and create unique interpretations of royal front hand mehndi designs.
FAQs
1. What is a royal front hand mehndi design?
A royal front hand mehndi design is an intricate and elegant mehndi pattern, typically featuring mandalas, floral motifs, and geometric patterns, designed to cover the palm and extend to the fingers and wrist.
2. Can beginners create royal mehndi designs?
Yes, with patience and practice, beginners can learn to create stunning royal front hand mehndi designs. Start with simple patterns and gradually progress to intricate ones.
3. How long does it take to complete a royal mehndi design?
A royal front hand mehndi design typically takes 1–2 hours, depending on the complexity and detailing involved.
4. How can I make my mehndi darker and long-lasting?
To enhance the color, apply a mixture of lemon juice and sugar after the mehndi dries. Keep the paste on for several hours, avoid water for the first 24 hours, and apply natural oils like coconut or eucalyptus oil.
5. What materials do I need for mehndi application?
You’ll need high-quality mehndi cones, cleaning supplies, moisturizer, and optional tools like toothpicks or fine brushes for detailing.
6. Can I customize a royal mehndi design?
Absolutely! Personalizing your royal front hand mehndi design allows you to add unique elements, such as initials, favorite motifs, or special themes.
myPascoConnect: A Comprehensive Guide to Pasco County’s Education Platform